Fabulous Info About How To Install All Libraries In Python VS Code

How To Install Python Libraries In Visual Studio Code Windows
Getting Started with Python Libraries in VS Code
1. Why Bother with Libraries Anyway?
So, you're diving into the world of Python and Visual Studio Code (VS Code), eh? Fantastic choice! Python is like the Swiss Army knife of programming languages, and VS Code is a supercharged text editor that can make your coding life a whole lot easier. But here's the thing: Python's real power comes from its libraries. Think of them as pre-built tools and functions that save you from reinventing the wheel every time you start a new project. Need to crunch numbers? There's NumPy. Want to build a website? Check out Flask or Django. Eager to work with data? Pandas is your friend. But before you can wield these powerful tools, you've got to get them installed and ready to roll inside VS Code.
Why is this so important? Imagine trying to build a house with only a hammer and nails. Sure, you could eventually do it, but it would be way easier if you had a saw, a drill, and maybe even a power sander. That's what libraries are for your Python projects — they give you the specialized tools you need to get the job done efficiently and effectively. Plus, installing them correctly in VS Code ensures that your editor knows where to find them and can provide helpful features like auto-completion and error checking.
Now, don't get intimidated. Installing Python libraries in VS Code isn't rocket science. It's more like assembling IKEA furniture — a little confusing at first, but perfectly manageable once you understand the instructions. And trust me, the payoff is well worth the effort. Once you've got your favorite libraries installed, you'll be coding like a pro in no time. Get ready to boost your Python skills to the next level!
We'll cover the best methods to install these libraries, ensure they are correctly configured in your VS Code environment, and address some common pitfalls you might encounter along the way. So buckle up, let's get these libraries set up so that you can unleash the full potential of Python inside VS Code.
The Easiest Way
2. Pip
Meet `pip`, Python's package installer. Think of `pip` as the app store for Python libraries. It allows you to easily search for, download, and install packages from the Python Package Index (PyPI). Its usually included with most Python installations, and it's the recommended way to install most packages. If you're ever unsure how to install a particular library, chances are `pip` is the answer.
Before we dive into the specifics, let's make sure you have `pip` installed and up to date. Open your terminal or command prompt and type `pip --version`. If you see a version number, congratulations! `pip` is ready to go. If not, you may need to install it manually. A quick Google search for "install pip Python" will give you instructions specific to your operating system.
Now, let's install a library using `pip`. For example, to install the `requests` library (which is super handy for making HTTP requests), you'd simply type `pip install requests` into your terminal and hit Enter. `pip` will then download and install the latest version of the library, along with any dependencies it needs. Easy peasy!
A few more helpful commands: `pip list` shows you all the packages currently installed in your Python environment, `pip uninstall ` removes a package, and `pip install --upgrade ` upgrades a package to the latest version. Mastering these commands will make you a `pip` power user in no time. With the help of pip you could manage your packages with ease and start coding. This is the simplest and most efficient way to manage your libraries.

Virtual Environments
3. Why Virtual Environments Matter
Okay, so you know how to install libraries using `pip`. That's great! But what if you're working on multiple Python projects, and each project needs a different version of the same library? This is where virtual environments come to the rescue. Think of a virtual environment as an isolated workspace for each of your projects. It allows you to install packages without affecting other projects or your system-wide Python installation.
Why is this so important? Imagine you have one project that requires version 1.0 of a library, and another project that needs version 2.0. If you install both versions globally, you're going to run into conflicts. Virtual environments prevent this by creating separate spaces for each project, each with its own set of installed packages.
Creating a virtual environment is a breeze. Open your terminal, navigate to your project directory, and type `python -m venv .venv` (you can replace `.venv` with any name you like for your environment directory). This creates a new virtual environment in a folder named `.venv`. To activate the environment, you'll need to run a different command depending on your operating system (e.g., `source .venv/bin/activate` on Linux/macOS, or `.venv\Scripts\activate` on Windows). Once activated, your terminal prompt will change to indicate that you're working inside the virtual environment.
Now, when you install packages using `pip` while the virtual environment is active, they'll be installed only in that environment, leaving your other projects untouched. When you are done, type `deactivate` to exit the virtual environment. It may seem a bit convoluted at first, but virtual environments are crucial for managing dependencies and keeping your projects organized. Using a separate venv makes your coding life easier and avoids any compatibility issues.

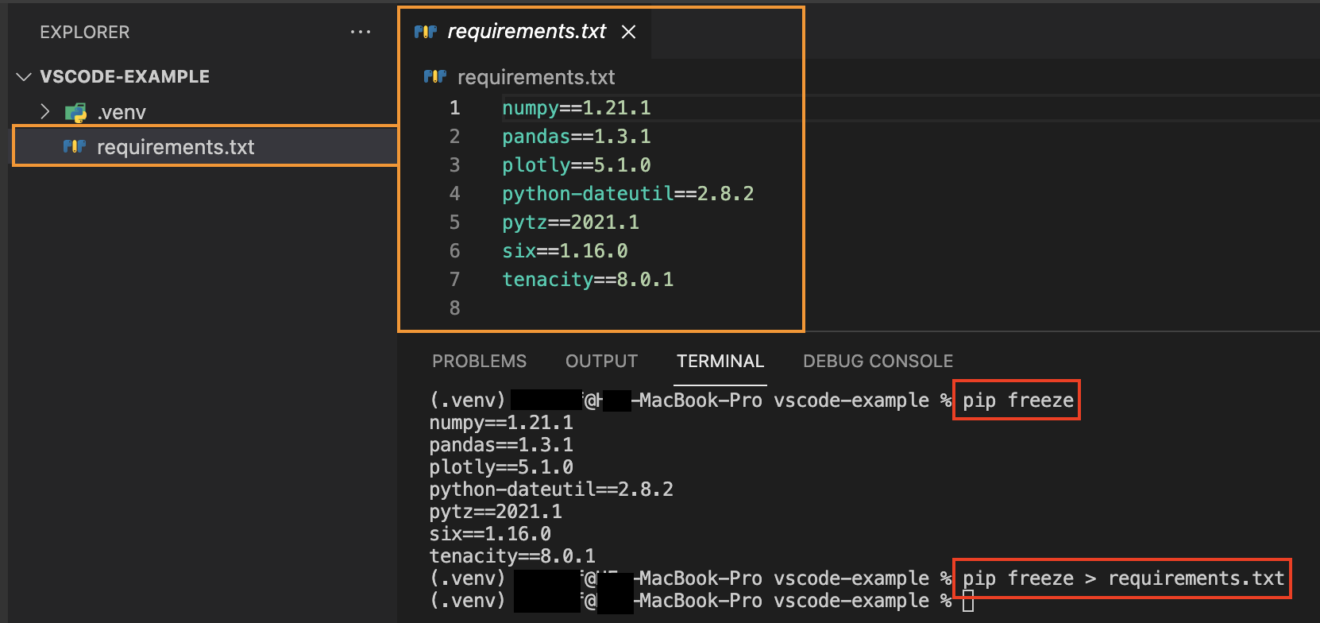
Installing Requirements.Txt In Visual Studio Code A StepByStep Guide
VS Code's Python Extension
4. Setting Up the Extension
VS Code has a fantastic Python extension that provides all sorts of helpful features, like code completion, linting, debugging, and more. If you haven't already, install the extension by going to the Extensions view (Ctrl+Shift+X or Cmd+Shift+X) and searching for "Python". Once installed, the extension will automatically detect your Python installations and virtual environments.
One of the most useful features of the Python extension is its ability to automatically select the correct Python interpreter for your project. When you open a Python file in VS Code, the extension will look for a virtual environment in your project directory and, if found, will automatically activate it. If you want to manually select a different interpreter, you can click on the Python version in the status bar (usually at the bottom-left of the VS Code window) and choose from the list of available interpreters.
The Python extension also integrates seamlessly with `pip`. You can open the VS Code terminal (View → Terminal) and use `pip` commands just like you would in a regular terminal. The extension will automatically recognize that you're working inside a virtual environment (if one is activated) and will install packages accordingly.
By default, VS Code may provide errors or warnings based on your code. In this case, you may need to configure it by installing `pylint` and `flake8` by running `pip install pylint flake8`. These tools can help identify potential problems in your code before you even run it, saving you time and effort in the long run. The Python extension is an essential tool for any Python developer using VS Code, so take some time to explore its features and customize it to your liking.

Setting Up VSCode For Python A Complete Guide DataCamp
Troubleshooting Common Issues
5. Fixing Common Problems
Sometimes, things don't go quite as planned. Here are a few common issues you might encounter when installing Python libraries in VS Code, along with some troubleshooting tips.
"ModuleNotFoundError: No module named '...'": This usually means that the library you're trying to import hasn't been installed in the correct environment. Double-check that you've activated the virtual environment (if you're using one) and that you've installed the library using `pip` while the environment is active. Also, make sure VS Code is using the correct Python interpreter (as described in the previous section).
Permission errors: If you're getting permission errors when trying to install a library, it might be because you don't have the necessary privileges. Try running the command prompt or terminal as an administrator (right-click and select "Run as administrator"). You can also try installing the library in a user-specific location by adding the `--user` flag to the `pip install` command (e.g., `pip install --user `).
"pip is not recognized as an internal or external command": This means that `pip` isn't in your system's PATH. Make sure that the Python installation directory (which contains `pip`) is added to your PATH environment variable. You can find instructions on how to do this specific to your operating system with a quick web search.
Slow internet connection: If it looks like your `pip` is stuck or cannot download the libraries, it may be due to your internet connection. Ensure you have a stable internet to download all libraries. If you're behind a proxy, you may need to configure `pip` to use the proxy. The errors are usually straightforward, and you can find all the answers you need online by searching for the specific error message. Don't be afraid to ask for help on forums or communities; there are plenty of experienced Python developers out there who are happy to lend a hand.